Landscaping system to use in collaborative displays with LEGO® pieces |
 |
HispaBrick Magazine® staff approved |
 |
1. What is MILS?One of the goals of the HispaBrick Magazine community is to build large dioramas about different LEGO® themes. In order to be able to make those dioramas all together, in an ordered way, we decided to establish a set of rules. Those rules are called MILS, an acronym for Modular integrated Landscaping System.
Moreover, we want to make a real demonstration of our rules. So we, the members of the HispaBrick Magazine team, are going
to prepare all the needed elements to build our modules, and use them in our dioramas. That is a nice way to check the
efficiency of the MILS rules. The progress of this project is expected to be shown in the next issues of HispaBrick Magazine®. |
 |
 |
 |
 |
 |
 |
 |
 |
| Links to other MILS resources HERE. |
| Once upon a time... The very beginning of the MILS system. |
2. Which are the basic MILS rules?In order to get a flexible, simple and a compatible system with many other elements we defined this basic rules for the MILS:
|
| Tip #1, Q&A:What happens with my previously built garden of 48x48 studs in a baseplate? May I put it within a MILS diorama? |
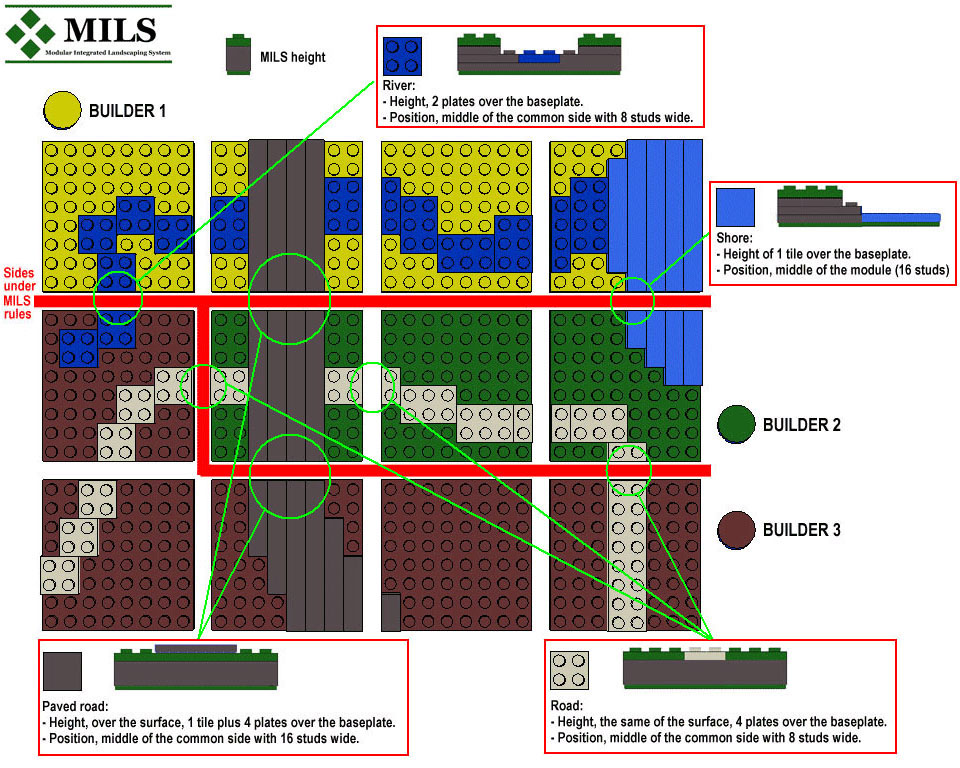
| SCHEMATIC EXAMPLE OF A DISPLAY WHERE MILS RULES ARE TO BE APPLIED: |
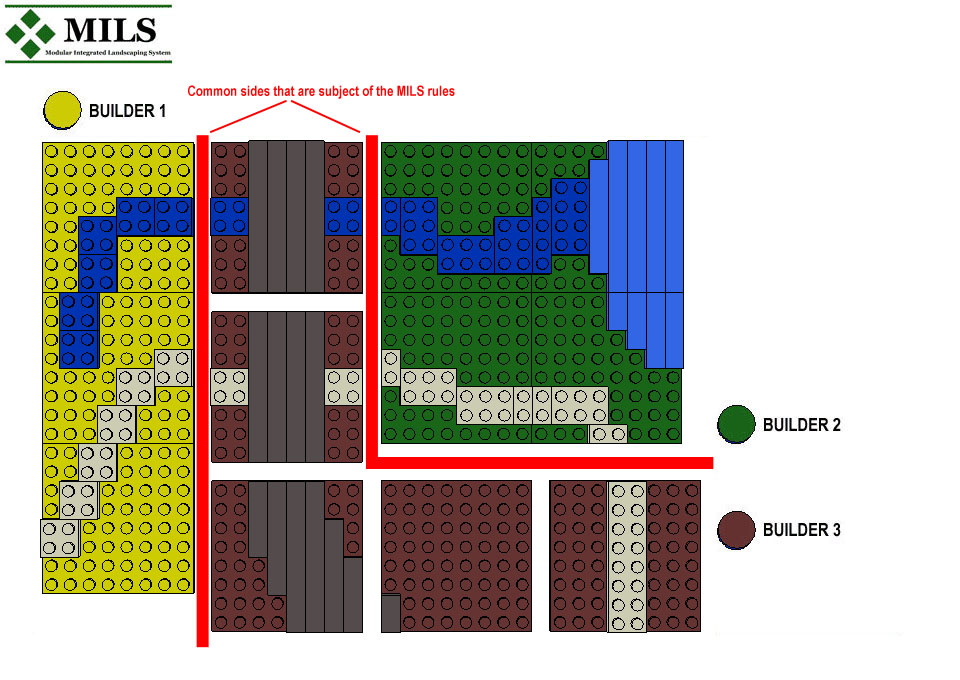 |
| Builder 1 sets up a large display, connected to elements of builder 2. Builder 3 sets up a square display connected to builder 2 display. MILS are intended to be applied to those sides remarked in red. The three builders can make all the diorama in a MILS way, but they are not oblied to. Just those parts in contact with others elements of other builders.
|
3. MILS elementsThe MILS modules are categorized in two main groups:
|
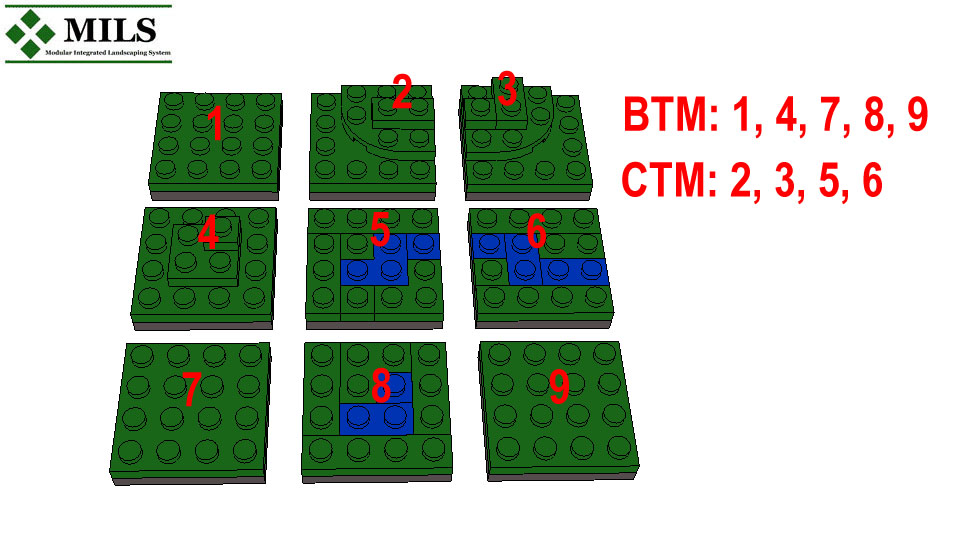 |
| In this example, modules 1, 7 y 9 are plain, so they can be oriented in every way without
disturbing adjacent modules. Module 4 has a small hill, but it is contained inside the module and its four sides are freely compatible
with adjacent modules. The same is applied to the module number 8. Modules 2 and 3, with a small mountain are CTM, as they cannot be oriented freely, because they have some sides that are compatible with adjacent modules. Modules 5 and 6 depicted a river, they are also CTM as the river extremes need to be connected with other river extremes.
|
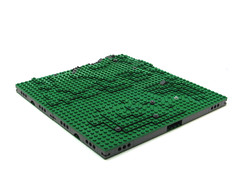
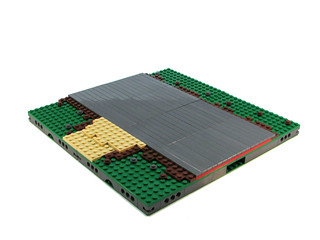
How do you build a BTU (BTM or CTM module)?All the modules are built over baseplates, these baseplates have to achieve 32x32 size, no matter how many baseplates you use, but the size of 32x32 studs is mandatory. This can be achieved with one 32x32 baseplate, 2 16x32 baseplates, 4 16x16 baseplates and so on. When you have your 32x32 surface, you must keep in your mind that 2x2 studs on every corner are reserved to put an identification colour, made with a 2x2 brick or any other bricks you can put there, is not mandatory, but it is recommended to avoid confusion about the ownership of different modules in a common display. Then, two 1x4 technic bricks are placed in one of each side of every corner. The rest of the sides can be completed as their owners want. Over these parts a surface made with plates gives the final height of a standard MILS module: 1 baseplate plus 4 plates. In the rest of the module there is no limit to put bricks or other pieces to act as a support for the plates in the top of the module. |
| Tip #2, Q&A: What is the identification corner? some examples please. |
|
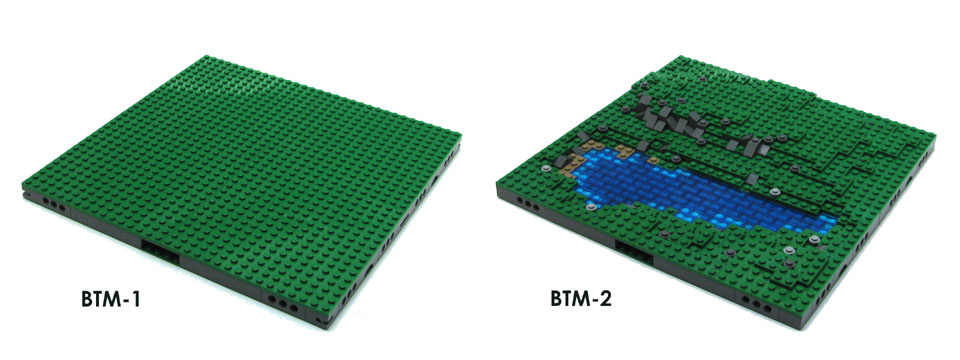
3.1. BTM (Basic terrain module)These are 32x32 modules with its 4 sides compatible with MILS rules. So that, they can be oriented in any way in its place without breaking the display of the adjacent elements or modules. For example, a green module inside a meadow, or a sand module in the middle of the desert. They are not intended to be a mere plain modules, they can have many constructions on it, unless those built features need a counterpart in the other side of an adjacent module, like a road or railway. |
| Tip #3, Legotron's BTMs:a different way! |
|
3.2. CTM (Compatible terrain module)There are several groups of CTM elements, that can be organized in these categories: |
| Roads and paved roads: |
| § The modules used to make paths, tracks or paved roads are within this group. The idea is very simple, all the road segments
can be built in every size or position that the own builder wants, but only if they are not intended to be in contact with elements
of another builders. Just in case they are placed in a joint side with other modules of a different builder, the part of the
road in the common side is obliged to have the described measures:
- Paths, located in the middle of the common side with 4 studs wide. The height of this type of road is the same of the standard MILS
height: 1 baseplate, plus 3 plates and the surface plate. These are intended to be irregular roads, with stones in the middle. 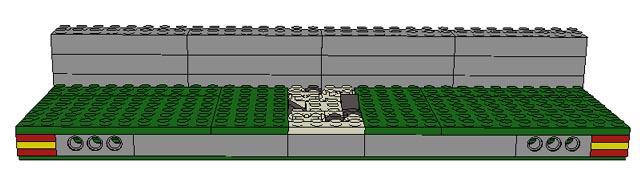 Example of the side of a MILS module with a path extreme.
- Tracks, located in the middle of the common side with 8 studs wide. The height of the road is the same of the standard MILS
height: 1 baseplate, plus 3 plates and the surface plate. 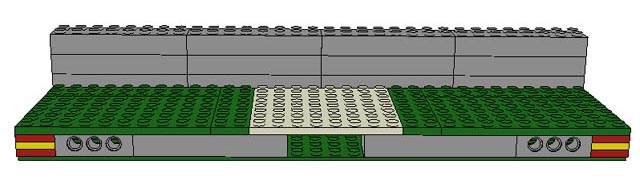 Example of the side of a MILS module with a track extreme. |
 |
 |
| Tip #4, Some LeoCAD examples of MILS modules of tracks: Examples |
- Paved roads, located in the middle of the common side with 16 studs wide. The height of the road is one plate higher that one of the standard MILS
height: 1 baseplate, plus 4 plates and the surface tile. This type of road is represented by tile pieces.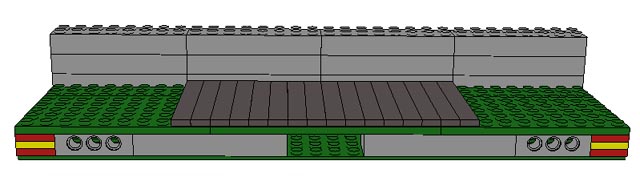 Example of the side of a MILS module with a paved road extreme.
| ||
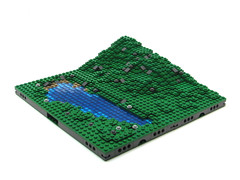
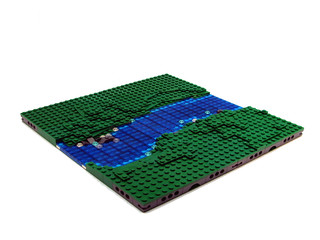
| Rivers: | ||
| § The modules containing rivers or fluvial curses are within this group. We have decided to use the trans dark blue color tiles
to depict the water in these modules. The plates they are placed on are blue, white, dark tan or other colours to provide
different water colors.
- Rivers, in this case, the same considerations explained for roads are applied. The common sides under MILS rules
needs the river ends located in the middle of the common side with 8 studs wide. The height of the river is of 2 plates over the
baseplate with its sides being higher, with the same level of the standard surface. 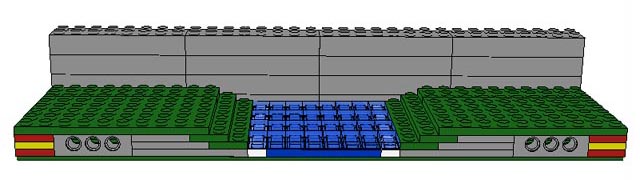 Example of the side of a MILS module with a river extreme. |
 |
 |
| Tip #5, One LeoCAD example of a full MILS module with a river: Example |
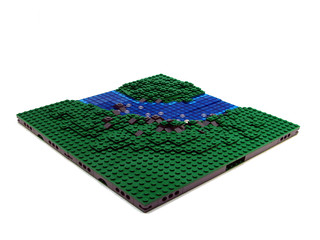
| Shores: |
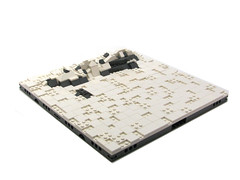
| § The modules containing lake or sea coastal sections are within this group. - Sea Shores, the transition part between the sea and the land is located in the middle of the common side (16 studs). The height of the water is of 1 plate over the baseplate. The main color of the sea water is depicted with blue tiles, but white and trans clear elements are welcome to build the waves.
|
 |
 |
| Tip #6, One LeoCAD example of a full MILS coastal module: Example |
| Tip #7, Q&A: If I have a 96x32 studs section of a beach, what does it happen with the MILS rules requirements of my beach modules? |
|
- Lake Shores, as their counterpart in the sea, the transition part between the sea and the land is located in the middle
of the common side (16 studs). The height of the water is of 1 plate over the baseplate. The main color of the lake water can be
built with trans dark blue tiles.
|
| Tip #8, Jetro's CTM modules: examples of shores |
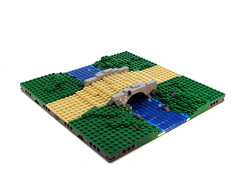
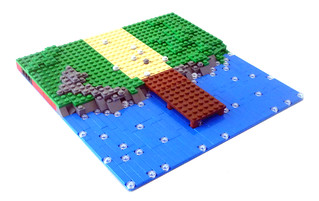
| Schematic example of a display of MILS modules with rivers, sea and roads: |
 |
| Modules are supposed to be of the same type of terrain, and compatible height in all cases. Those parts of the river within the builder 1 modules don't need to fulfill the MILS rules, as they are located inside its own display. But, when the river join the builder 3 part of the river those sides of both builders are obliged to fulfill the MILS rules. The common part of the shore is located in the middle of the side (16 studs) of the module for both builders. They can have different coastline design, but the sea has an end in the same position just on the sides. The paved road has 2 common joint points of three different builders, all of them have to provide compatible sides with MILS rules to display a common road. In the case of the builder 3, the rest of the road (bottom) is up to him as no other builder is affected by that part of the road.
|
| Tip #9 Q&A: Can I mix different types of modules in one module? |
| Tip #10 Q&A: Why do you only have examples of green terrain? |
| Tip #11 Q&A: Why don't you put trees or other details in the pictures? |
| Hills: |
| § The modules containing hill sections are within this group. - A Hill is intended to be a little part of terrain with soft elevations. As the main colour of our modules is green, our hills the green colour will be predominant in the construction of hill modules. Elements in gray or earth colours are welcome. We want to make the MILS rules as simple as possible. So that we have defined a new concept: the profile. A profile is the shape that must have the side of a module. The MILS rules reduce the available profiles to a very few options, so it is very easy to know all the possibilities to get a hill module compatible with MILS system. These profiles will be the templates to mold all the sides of hill modules. When two different hill modules are going to be joined they must have the same profile in the common sides. This is a key factor to get a continuous landscape without gaps or inconsistent jumps.
These are the four different profiles: In the case of mountains deviation for this rule is 1 plate below or over the theoretical height line of the corresponding profile. These profiles can be combined in the sides of the modules:
|
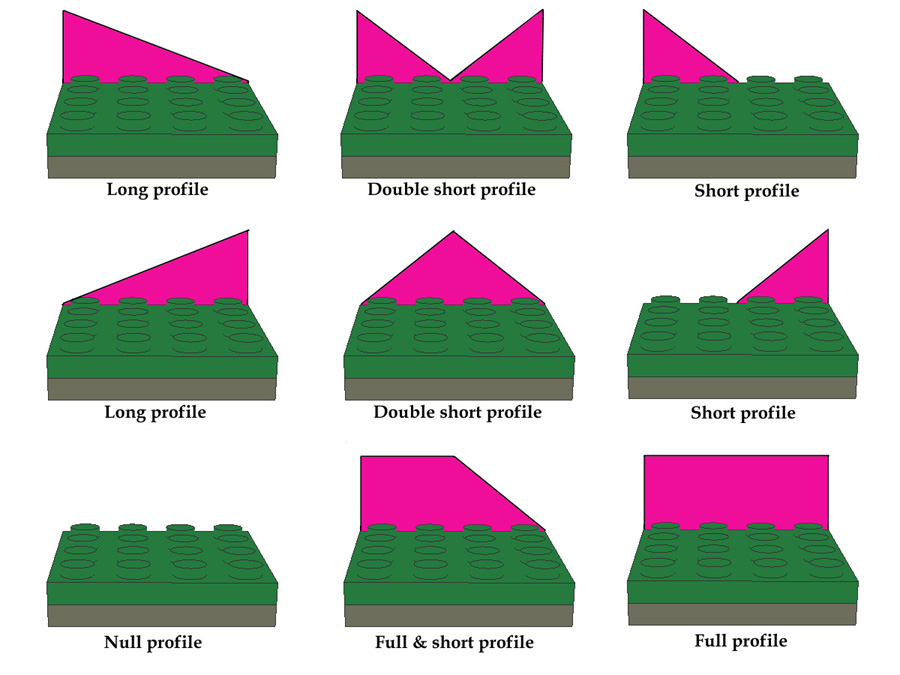 Profile examples |
| |
| Tip #12, Q&A: I want to build hills with different height and shape, is that compatible with MILS rules? |
| Each hill module can have any combination of these profiles. The easiest modules will be constructed with some
sides at surface level, and other two sides with a sloping profile, such as the corner of a hill. The most complex modules will have
the four sides with sloping profiles and full profiles. In order to get a common way to identify the different types of modules used
to form a hill we have defined a nomenclature based on the type of profiles of the module. To start de definition of the module we begin
with the nearest side, usually the lowest side, and we choose the most appropriate term: short, long, null,... and then we continue
with the rest of the sides clockwise, till label the four sides. This is the way to ease the identification of type of hill module we are talking about. For example, if we want to build a hill null-short-long-null step, this means we want to build a corner of a hill.
|
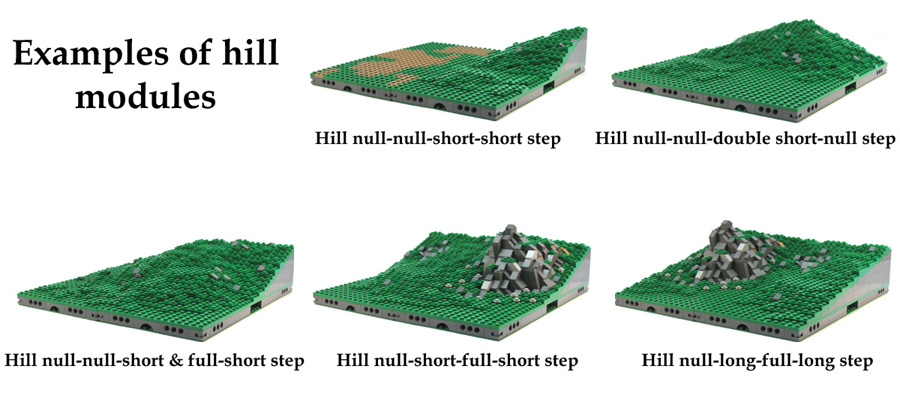 Some examples of MILS modules of hills |
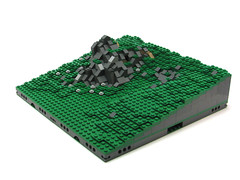
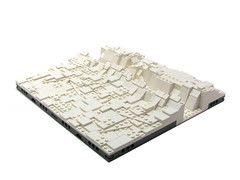
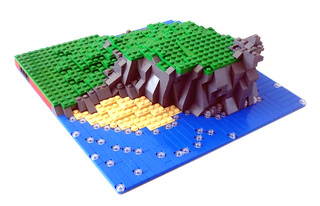
| Mountains: |
| § The modules containing mountains sections are within this group. - A Mountain is intended to be a little part of terrain with rough elevations and moderate height. Although the main colour of our modules is green, mountain modules will be made predominantly with gray colours, to emphasize their rough aspect. In order to keep the MILS rules as simple as possible, we have used the same method stated for hills, so the concept of profile is also used in mountains. A profile is the shape that must have the side of a module. The MILS rules reduce the available profiles to a very few options, so it is very easy to know all the possibilities to get a mountain module compatible with MILS system. These profiles will be the templates to mold all the sides of mountain modules. When two different mountain modules are going to be joined they must have the same profile in the common sides. This is a key factor to get a continuous landscape without gaps or inconsistent jumps.
These are the four different profiles: In the case of mountains deviation for this rule is 1 brick below or over the theoretical height line of the corresponding profile. These profiles can be combined in the sides of the modules in the same way as the hills:
|
Profile examples |
| |
| Each mountain module can have any combination of these profiles. The easiest modules will be constructed with some
sides at surface level, and other two sides with a sloping profile, such as the corner of a mountain. The most complex modules will have
the four sides with sloping profiles and full profiles. In order to get a common way to identify the different types of modules used
to form a mountain we have defined the same nomenclature as that used with hills, based on the type of profiles of the module. To start de definition of the module we begin
with the nearest side, usually the lowest side, and we choose the most appropriate term: short, long, null,... and then we continue
with the rest of the sides clockwise, till label the four sides. This is the way to ease the identification of type of mountain module we are talking about.
|
| Mountain can have many different shapes, and this rule is only applied on the common sides of the modules intended to be
joining with different builder's mountains, so not all the mountains in a MILS diorama need to have the same aspect, it is just a question to try to get
the best way to have compatible mountains with the most beautiful aspect.
|
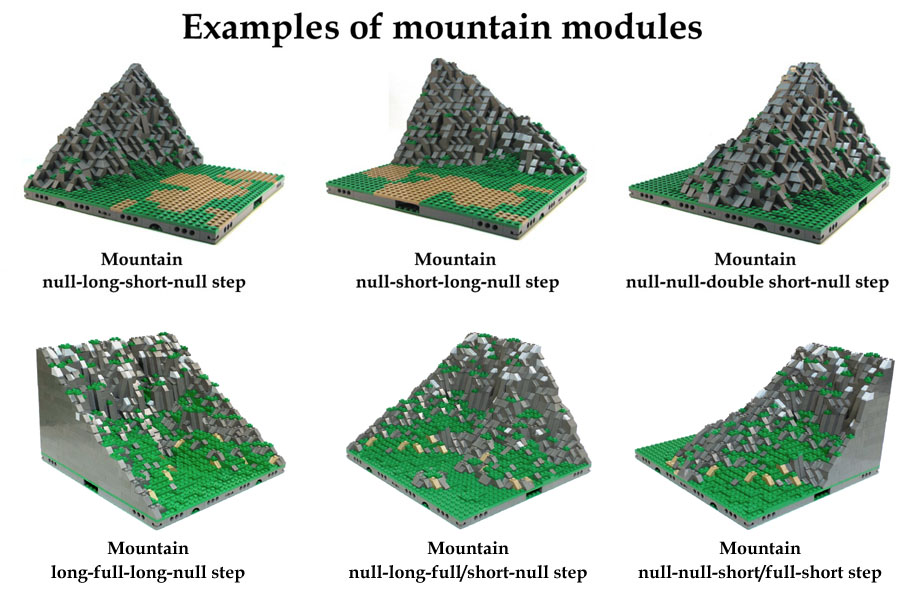 Some examples of MILS modules of mountains |
| Tip #13, Q&A: So, is 16 bricks the maximun height of a MILS mountain? |
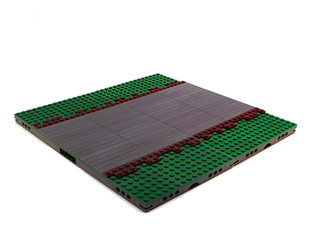
4. MODGRUPS (MILS compatible sections made up of non MILS elements)One of the main problems with modular landscapes is the final appearance, they seem to be like a chessboard. This was critical with elements or features that need several modules to be carried out, as can be seen with roads or rivers. To preserve the simplicity of the MILS rules, the terrain elements must have a very restricted measures in the borders of the modules. The more simple the rules are the less diversity of terrains can be displayed in a diorama. We can have a section of a road with many curves, but they are always of 90 degrees. So we need a new element to confront that. That element must have to be compatible in some way with MILS rules, but with more options to display terrain features different than those one depicted by our rules. So the idea is to pack several modules, with many sides no compatible with MILS rules, to combine them in a bigger element, in such way that the final outer border will be MILS compatible. This sets of modules with these characteristics will be called "modgrups". There is no size or shape to delimit a modgrup, but they must always have an edge of multiple elements of 32x32 studs. |
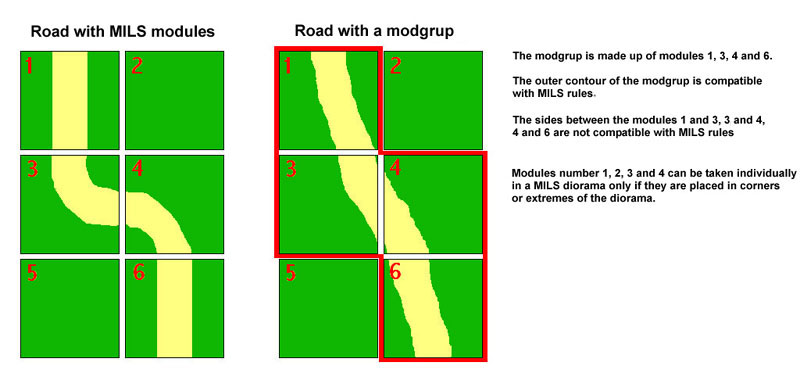 The same tarrain feature made with MILS modules versus a modgrup composed of MILS and non MILS elements |
| Tip #14, Some examples of modgrups: Examples |
| The modgrups can be very useful if they are used to construct river sections or roads sections with different wide, or with
a curved run too complicated to be built with MILS modules. There is a chance to use this type of elements to get a better appearance, with more
realistic terrain features. The modgrups can be seen as an extension to the simplicity of the rules of the MILS system, that are intended to be as
simple as possible, in order to get an easy way to have common elements of terrain made by different builders in the same diorama. You can use the modules of the modgrups individually with other MILS modules under some circumstances. They need to have a good design to do so. But they are not restricted to be used within a modgrup.
|
| Tip #15, A gallery with many MILS modules |
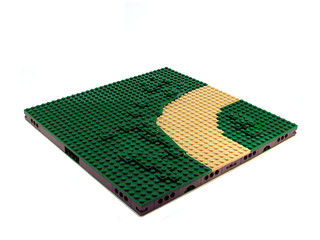
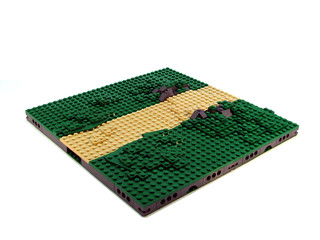
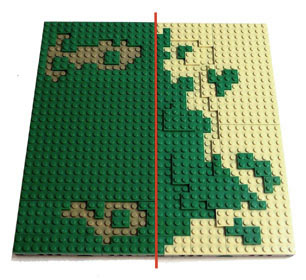
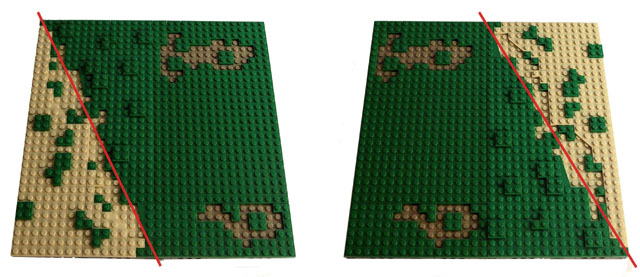
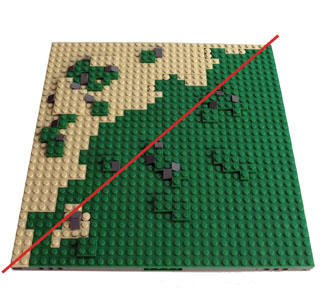
5. Transition modules between different terrain typesAll the modules of this group fit in the general category of CTM (Compatible Terrain Modules). Their orientation is obviously determined by the type of landscapes we want to link, and to this end we need to define where each type of terrain (grass, sand, snow, etc.) will connect, and create a gradual union between the two rather than a straight lines. |
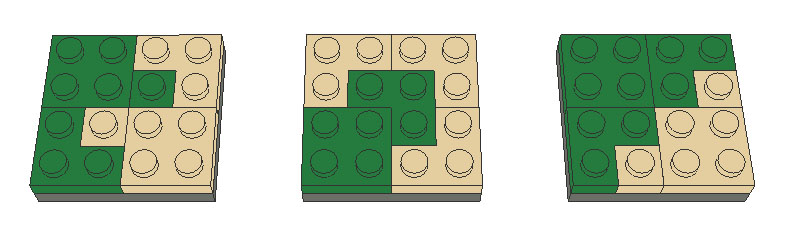 Schematics of modules with different terrain types within |
In each 32x32 module there will be one part that that represents one of the two terrains you want to combine and another
with the second type of terrain. If you draw a straight line separating the two types of terrain, from the top to the bottom of the module you
can distinguish between the following cases:
|
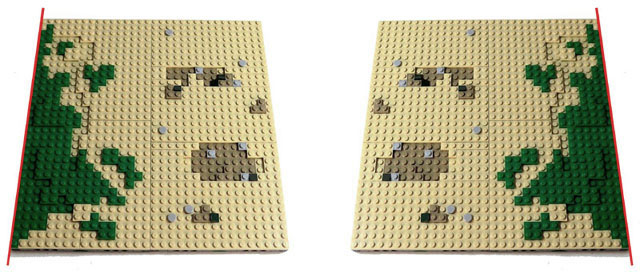
| Tip #16, Some examples of complex transition terrains with MILS modules: Examples |
| Next to come... |
| Soon |
A. Bellón© HispaBrick Magazine® © |